
I hate paying for knitting patterns (or any other kind of pattern really). There are so many great ones on the internet, that if you trawl for long enough, you'll eventually find exactly what you're looking for. This one took me ages to find, but when I did, boy was I excited. It's the perfect combo of manly Scottish sailor and feminine first date. Plus, the boat-neck finish with accentuate your long and thin neck. I just had to share it!

I'm not going to sugar coat it, it's a pretty difficult pattern. It took me a few times to interpret and correctly knit it the first few times. But your struggles will definitely pay off with a cozy autumn
hand-created sweater (or just in time for Winter if you're a bit slower and live in the Southern hemisphere like me)!
hand-created sweater (or just in time for Winter if you're a bit slower and live in the Southern hemisphere like me)!

BEATNIK BOAT-NECK PULLOVER
Size
XS[S, M, L, 1X, 2X, 3X] (shown in size S)
XS[S, M, L, 1X, 2X, 3X] (shown in size S)
Finished Measurements
Chest: 32[36, 40, 44, 48, 52, 56] inches
Length: 24.5[24.5, 25 .5, 26.5, 27, 27.5, 28.5] inches
Materials
Yarn
Recommended needle size
[always use a needle size that gives you the gauge listed below -- every knitter's gauge is unique]
Notions
GAUGE
18 sts/23 rows = 4" in stockinette stitch, using larger needles
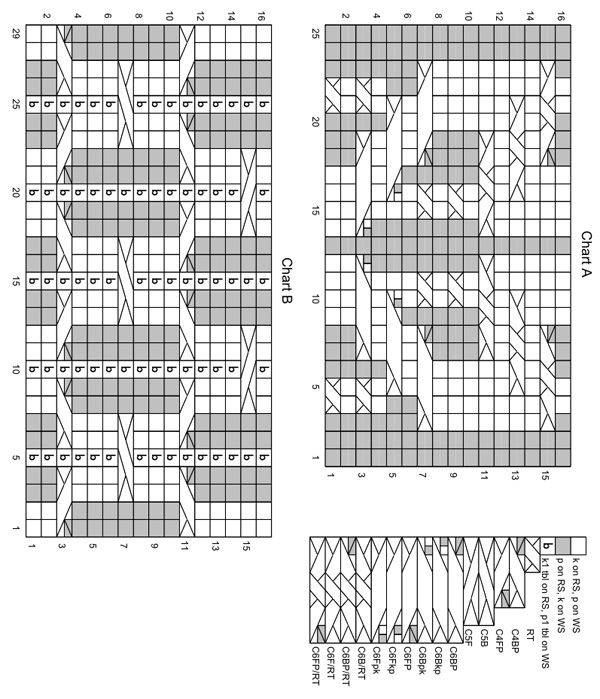
25 sts of Chart A = 3.5” wide
29 sts of Chart B = 5” wide
Pattern Notes
Twisted 1x1 Rib (Worked over an even number of sts): All Rows or Rounds: [K1 tbl, p1 tbl] to end.
Moss Stitch (Worked over an even number of sts; odd-numbered rows are RS rows):
Rows 1-2: [K1, p1] to end.
Rows 3-4: [P1, k1] to end.
Repeat Rows 1-4 for Moss Stitch.
m1p (Make 1 purl stitch): Insert left needle, from back to front, under strand of yarn which runs between last stitch on left needle and first stitch on right needle; purl this stitch. 1 st increased (stitch will be twisted).
RT (Right Twist): K2tog, but do not drop sts from left needle; k into front loop of first st on left needle, drop both sts from left needle.
C4BP: Slip 2 sts to cable needle and hold to back of work; k2 from left needle, p2 from cable needle.
C4FP: Slip 2 sts to cable needle and hold to front of work; p2 from left needle, k2 from cable needle.
C5B: Slip 3 sts to cable needle and hold to back of work; k2 from left needle, slip last st from cable needle to left needle and k tbl; k2 from cable needle.
C5F: Slip 3 sts to cable needle and hold to front of work; k2 from left needle, slip last st from cable needle to left needle and k tbl; k2 from cable needle.
C6BP: Slip 2 sts to cable needle and hold to back of work; k4 from left needle, p2 from cable needle.
C6Bkp: Slip 2 sts to cable needle and hold to back of work; k4 from left needle, [k1, p1] from cable needle.
C6Bpk: Slip 2 sts to cable needle and hold to back of work; k4 from left needle, [p1, k1] from cable needle.
C6FP: Slip 4 sts to cable needle and hold to front of work; p2 from left needle, k4 from cable needle.
C6Fkp: Slip 4 sts to cable needle and hold to front of work; [k1, p1] from left needle, k4 from cable needle.
C6Fpk: Slip 4 sts to cable needle and hold to front of work; [p1, k1] from left needle, k4 from cable needle.
C6B/RT: Slip 2 sts to cable needle and hold to back of work; [p1, RT, p1] from left needle, k2 from cable needle.
C6BP/RT: Slip 2 sts to cable needle and hold to back of work; [p1, RT, p1] from left needle, p2 from cable needle.
C6F/RT: Slip 4 sts to cable needle and hold to front of work; k2 from left needle, [p1, RT, p1] from cable needle.
C6FP/RT: Slip 4 sts to cable needle and hold to front of work; p2 from left needle, [p1, RT, p1] from cable needle.
Directions for whip stitch can be found here.
Charts The charts for this pattern are very large and fit on a letter-sized page.
Click here and print the resulting page.
Editor's note: I'm knitting this sweater and needed a color key to follow the charts. So I'm making the color-coded version of the chart available for you, too. Click here.
Directions
BackUsing smaller straight needles, CO 78[90, 98, 110, 118, 130, 138] sts.
Work in Twisted 1x1 Rib until work measures 2.5 inches, ending with a RS row. Switching to larger needles, establish pattern as follows: Next Row [WS]: P6[12, 16, 22, 26, 32, 36], place marker, [m1p, p5, m1p, p6] six times, m1p, place marker, p6[12, 16, 22, 26, 32, 36]. 91[103, 111, 123, 131, 143, 151] sts; 79 sts between markers. Set-up Row [RS]: Work in Moss Stitch to first marker, slip marker, work Row 1 of Chart A, work Row 1 of Chart B, work Row 1 of Chart A, slip marker, work in Moss Stitch to end. This row sets pattern for back. Continue in pattern until work measures 3.5[3.5, 4, 4, 4, 4, 4] inches, ending with a WS row. Waist Decrease Row [RS]: K1, k2tog, work in pattern to last 3 sts, ssk, k1. Work 5 rows in pattern. Repeat these 6 rows twice more, then work Waist Decrease Row once more. 83[95, 103, 115, 123, 135, 143] sts. Continue in pattern until work measures 12.5[12.5, 13, 13, 13, 13, 13] inches, ending with a WS row. Waist Increase Row [RS]: K1, m1, work in pattern to last st, m1, k1. Work 3 rows in pattern. Repeat these 4 rows twice more, then work Waist Increase Row once more. 91[103, 111, 123, 131, 143, 151] sts. Continue in pattern until work measures 15.5[15.5, 16, 16.5, 16.5, 17, 17] inches, ending with a WS row. Shape Armholes Sizes L, 1X, 2X, 3X Only: BO 4 sts at beginning of next -[-, -, 2, 2, 4, 4] rows. -[-, -, 115, 123, 127, 135] sts. All Sizes: BO 3 sts at beginning of next 2[4, 4, 2, 4, 4, 4] rows. 85[91, 99, 109, 111, 115, 123] sts. BO 2 sts at beginning of next 4[2, 4, 4, 4, 2, 4] rows. 77[87, 91, 101, 103, 111, 115] sts. BO 1 st at beginning of next 4[4, 4, 6, 4, 4, 4] rows. 73[83, 87, 95, 99, 107, 111] sts. Continue in pattern until work measures 23[23.5, 24.5, 25.5, 26, 27, 27.5] inches (7.5[8, 8.5, 9, 9.5, 10, 10.5] inches from beginning of armhole shaping), ending with a WS row.
Shape Shoulders and NecklineRow 1 [RS]: BO 4[6, 6, 6, 6, 8, 8] sts, work in pattern until there are 22[24, 24, 28, 28, 30, 30] sts on right needle; join second ball of yarn, BO next 21[23, 27, 27, 31, 31, 35] sts, work in pattern to end.
Note: In the directions that follow, a semi-colon will indicate a break between the two sets of sts, each set with its own ball of yarn attached.
Row 2 [WS]: BO 4[6, 6, 6, 6, 8, 8] sts, work in pattern to end of first set of sts; BO 7 sts, work in pattern to end.
Rows 3-4: BO 4[5, 5, 7, 7, 8, 8] sts, work in pattern to end of first set of sts; BO 7 sts, work in pattern to end.
Row 5 [RS]: BO remaining 4[5, 5, 7, 7, 8, 8] sts of first set of sts; BO 7 sts, work in pattern to end.
BO remaining 4[5, 5, 7, 7, 8, 8] sts.
Front
Work as for back until work measures 2 inches less than back to beginning of shoulder/neckline shaping, ending with a WS row.
Shape Shoulders and Neckline
Row 1 [RS]: Work 26[30, 30, 34, 34, 38, 38] sts in pattern; join second ball of yarn, BO next 21[23, 27, 27, 31, 31, 35] sts, work in pattern to end. Two sets of 26[30, 30, 34, 34, 38, 38] sts, each set with its own ball of yarn attached.
Rows 2-3: Work first set of sts in pattern; BO 6 sts, work in pattern to end. 20[24, 24, 28, 28, 32, 32] sts in each set.
Rows 4-5: Work first set of sts in pattern; BO 4 sts, work in pattern to end. 16[20, 20, 24, 24, 28, 28] sts in each set.
Rows 6-7: Work first set of sts in pattern; BO 2 sts, work in pattern to end. 14[18, 18, 22, 22, 26, 26] sts in each set.
Rows 8-11: Work first set of sts in pattern; BO 1 st, work in pattern to end. 12[16, 16, 20, 20, 24, 24] sts in each set.
At end of Row 11, work should measure same as back to beginning of shoulder shaping.
Rows 12-13: BO 4[6, 6, 6, 6, 8, 8] sts, work in pattern to end.
Rows 14-15: BO 4[5, 5, 7, 7, 8, 8] sts, work in pattern to end.
Row 16 [WS]: BO remaining 4[5, 5, 7, 7, 8, 8] sts of first set of sts; work in pattern to end.
BO remaining 4[5, 5, 7, 7, 8, 8] sts.
Sleeves (Make 2):
Using smaller straight needles, CO 42[44, 46, 50, 52, 54, 56] sts. Work in Twisted 1x1 Rib until work measures 3 inches, ending with a RS row. Switch to larger needles and p 1 row, evenly decreasing 4 sts. 38[40, 42, 46, 48, 50, 52] sts. Work 6 rows in Moss Stitch, ending with a WS row. Increase Row [RS]: K1, m1, work in pattern to last st, m1, k1. Work 7[5, 5, 5, 5, 3, 3] rows in pattern. Repeat these 8[6, 6, 6, 6, 4, 4] rows 4[5, 6, 7, 8, 3, 4] times more, then work Increase Row once more. 50[54, 58, 64, 68, 60, 64] sts. Sizes 2X, 3X Only: Work 5 rows in pattern. Work Increase Row. Repeat these 6 rows 5 times more. -[-, -, -, -, 72, 76] sts. All Sizes: Continue in pattern until work measures 12[12, 12, 12.5, 12.5, 12.5, 13] inches or desired length to underarm, ending with a WS row. Shape Sleeve Cap BO 3 sts at beginning of next 2 rows. 44[48, 52, 58, 62, 66, 70] sts. BO 2 sts at beginning of next 2 rows. 40[44, 48, 54, 58, 62, 66] sts. Next Row [RS]: K1, k2tog, work in pattern to last 3 sts, ssk, k1. Work 1 row in pattern. Repeat these 2 rows 7[8, 10, 11, 13, 14, 15] times more. 24[26, 26, 30, 30, 32, 34] sts. BO 2 sts at beginning of next 2 rows. 20[22, 22, 26, 26, 28, 30] sts. BO 3 sts at beginning of next next 2 rows. BO remaining 14[16, 16, 20, 20, 22, 24] sts.
Voila. I haven't finished mine yet, but I'd love to hear from you if you have!
The original pattern can be found here. If you don't feel comfortable with your cabling skills just yet, check out these cable samples that you can knit up and try out. |


nice cloth.Amazing post and Articles. I like those post and Styles product and Jewelry . Thank you very much Share with us. I know another site like this. You can See that site here. Also you can buy it many different thinks there.
ReplyDeleteColor matching cabinet